Tuesday, March 6, 2012

My first 'taping' adventure.

I'd been hesitant to try the scotch tape mani trend just because my nails are curved pretty heavily so every attempt so far has just been a failure because it doesn't stick or it doesn't sit straight. But I forged through because I saw a design idea that was too cute to ignore so I bit the bullet and got to taping. Here's my nautical themed mani, a little early but I was hoping to will summer to come early by encouraging it with my nails.

The colors I used were China Glaze Bermuda Breakaway, Sally Hansen White On and China Glaze City Siren for the red heart.


Ugh, there was a little smudge on my middle finger that I couldn't get rid of. But do you see what I mean by the lines not laying totally straight? You can really see it on my middle finger. 


I LOVED how this looked but the process made me want to kick a pony. I won't lie, I did my left hand and had to go to bed before starting to work on the right one because the tape was driving me nuts. I loved the little heart in the corner though. I'll probably try to add that into others eventually. 

Seasonal Nail Wheels

I made nail wheels for both Halloween and Christmas but never got around to posting them because I kept forgetting. So here they are, albeit a little later haha.

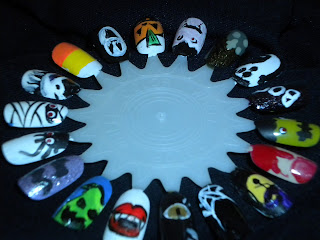
First, here's the Halloween one:
I used so many different colors and acrylic paints and mixtures of colors that I don't even remember half of what is on here but if you want a specific color, I can probably pick my brain to find what I used.
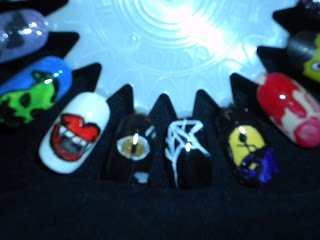
Here's the finished product all laid out!

L-R: Oogie Boogie, Vampire mouth (which came out looking more like the Rolling Stones lips), cat eye, spiderweb, Nightmare Before Christmas, dripping blood. 

Along with the ones already pictured, there is a Frankenstein and a 'boo'. 


L-R: Boo, Ghost inspired by my little decorations I had hanging up, graveyard with a spooky tree, a vampire, pumpkin and the Scream mask. 

Candy Corn, Zero from Nightmare Before Christmas, a mummy, a spider and some cute little bats. 


On to Christmas!
For some reason, my pictures refuse to flip the right way so I apologize for that. 

Rudolph, a string of lights, palm tree Christmas, snowflakes, gingerbread man and a candy cane French tip.

Then there's a Christmas tree, a snowman, red and green sponged under black crackle and a snowy evening.

This is where the flipping gets funny but it lets you see the 'snowy evening' a little better. Then there's a little elf, a wreath, a package and bow and Santa. 

Then next to Santa, there's some holly berries, tartan plaid, bells, Rudolph's girlfriend and Rudolph

I love doing nail wheels for seasonal stuff instead of doing it on my own nails just because it takes so long and my right hand usually ends up frustrating me that it's not worth it in the end. Also, these designs are so cute that I'd hate to take a cotton ball full of acetone to them. I have one more that I'll be posting soon, it's my favorite one!

Friday, February 17, 2012

SEC Football- My first adventure with a nail wheel


So, I'm a huge football fan, namely the Florida Gators and Georgia Bulldogs. I'm aware that this is sacrilege to admit in either state, but I love that damn bulldog so much. In order to gear up for football season this year, I made a nail wheel with each team's logo in the conference and some little football designs. I also broke off a nail accidentally, but give me a break on my first try. 
SEC logo, LSU, Ole Miss, Arkansas, Mississippi State

Mississippi State, Vanderbilt, ESPN logo, Florida, football

Field goal, Georgia, South Carolina, Alabama (with Bear Bryant's houndstooth), SEC logo, LSU


Football, Kentucky, football field, Auburn, Tennessee and a field goal

Hope you enjoyed it!

I'm alive!
Holy crap I have not been updating the blog at all. Okay I'm back now and I have a lot of nails to show. This post is going to be a photo bomb of everything that I've done. Most of it is already up on the facebook page but here is a more in depth look. Here we go!


Alright, this one was done on a whim because I was house-sitting for my mom and I was bored so I dug through my sister's polish stash to try some new colors. I used Essie's Smokin' Hot as the base, stamped with my Konad m41 plate and I believe the image was stamped with Sally Hansen's Lacey Lilac. The gold stripe was done with one of my sister's polishes. I didn't catch the name and I'm kicking myself because I wanted to pick it up but it was a gold striping polish from Claire's.

This one was done with my Halloween costume in mind. I had a 'sexy cab driver' costume that I got during a Halloween closeout and I was playing with nail ideas awhile beforehand. This one was done with China Glaze Happy Go Lucky on the tips, Sally Hansen's White On as the base and my Konad m63 plate. 

For this mani, I used China Glaze City Siren (my new favorite red!), Sally Hansen's White On and black Stripe-Rite. I used a dotting tool for the polka dots. I have no idea what inspired this but I think I just wanted an excuse to play with the red polish. It kinda reminds me of a Dalmation at the firehouse. 

This might be one of my absolute favorite manis that I've ever done. My husband and I are getting into hunting and I had just gotten a bunch of camo to wear in the field and I was inspired by it. It helped a lot that I'd also just gotten into the army/camo green trend and had just gotten a haul full of them. I'm not sure how many greens that I actually wound up using, but I do know that the orange is Sun Worshipper by China Glaze with a random neon orange layered over the top to get that blaze orange shade. I also know that a few of the colors used in the camo are Essie's Sew Psyched and Little Brown Dress, black Stripe Rite, White On and China Glaze's Westside Warrior. The deer was supposed to be stamped on with one of my Bundle Monster plates with LBD but it absolutely did not want to do more than an outline so I worked with what it gave me and freehanded the rest. 

Halloween! I had tons of fun with Halloween ideas for the week leading up to Halloween and honestly, a little before that as well. On my thumb, we have the witch on her broomstick, a carved pumpkin on my index finger, Frankenstein on the middle, a spider web on the ring finger and bats on my pinky. I loved the witch and had to get an up close picture of it to show the detail. I had the same issue with the stamping that I did with a deer and wound up filling in a lot of the what didn't want to stamp. 


This was my favorite Halloween design and it was the one that I wound up wearing on the actual night of Halloween. I got into the blood splatter trend thinking that I came up with it myself only to find that it was totally the craze for Halloween manis. Oh well, it still looked cool and it got a lot of attention. I used OPI Skull and Glossbones for the base and China Glaze City Siren as the blood. I even added some bloody fingerprints using red acrylic paints and... my fingerprints. 

This was my attempt to make a political statement on my nails. In November, Ohio had a crucial piece of legislation being pushed through by the governor that would strip union rights and eliminate collective bargaining for the public sector. I'm a future teacher, married to a teacher, daughter-in-law of a firefighter and granddaughter-in-law to a retired teacher with about 4 other teachers and nurses as aunts and uncles. I was very proud to be a part of the effort to kill Senate Bill 5 and stand up for Ohio. 

Okay, on a lighter note, I also started trying my hand at water marbling. My first attempt was so terrible that I didn't even photograph it but the second attempt was much more successful. I used White On as my base and marbled with CG Happy Go Lucky, Concrete Catwalk and Urban Nights. 


This was inspired by one of the nail wheels that I started working on. I was doing a 'night sky' and did a gradient sponge paint with blues and purples and came up with this! I used so many colors in this that I don't remember which ones are all in there, but I finished the look by topping the whole thing with CG In The City.


Tuesday, September 20, 2011

Splatter

I got pretty lazy for a few weeks and kept my nails simple with just one color. It was pretty out of character for me as of late, I won't lie. I think the angry birds tired me out. But I found an awesome tutorial that I couldn't pass up. At The PolishAholic, there is an amazing tutorial for Splatter nails that I fell in love with. Each time you do it, you're guaranteed to have a unique and individual mani. Since football season has officially started, I decided to kick off my fall nail season in support of my Florida Gators. Yes, I live in Ohio but I love the Gators and will accept all the dirty looks that my Gator Gear brings me.


For this mani, I followed the steps linked above and used the following colors:
Salley Hansen White On for the base
OPI Ogre The Top Blue
OPI In My Back Pocket
Seche Vite topcoat


I didn't have a variety of straws laying around and it was only by luck that I'd gone to McDonald's earlier that day and had my drink sitting next to me so there was a straw available. When I do it again, I'll probably be using a smaller straw. The McDonald's straw was pretty big so I think a smaller area will make it a bit more controlled. I wound up with a big stripey blob of blue on my index finger that I just accepted after awhile. A smaller straw will definitely make more of a 'splatter' but I liked the way this turned out too!

Angry Birds!


I've finally uploaded my Angry Bird nail design! This was probably the most ridiculously involved nail art that I've ever done and I actually started it by accident. I was originally just going to stick with the polka dots but  I felt like it needed something else. So I tried to add a little blue whale as an accent on my ring finger... but that little whale was shaped like a bird for some reason. Now I had a random blue bird shape, so I said screw it, they're angry birds now. THEN I was only going to do the blue bird, but I felt like that would be stupid so I just went for it. At 3 am. A lot of these colors are mixes, like the gray in the bomb bird, the orange beaks and the green pigs. 

The background colors are Essie Borrowed and Blue (base) with OPI Fiercely Fiona and Salley Hansen White On as the dots, which was also the white I used for the rest of the design. The green grass and green bird is Essie Pretty Edgy. On the slingshot, I used Sephora by OPI Leotard Optional for the stick and Essie Little Brown Dress for the rubber band. The red bird is Salley Hansen Right Said Red, OPI POTC Collection  Stranger Tides. The green pigs are a mix of Pretty Edgy and OPI Who The Shrek Are You. Yellow bird is my favorite shade of yellow, OPI The It Color with Stranger Tides on his belly and finally, the blue bird is OPI Ogre The Top Blue. 

I kept this one for as long as I possibly could because it was so much fun. I got tons of compliments and my sister drove me crazy to do her nails too. I'll be honest, this was probably the most tiring art that I've ever done. It took me two days because I absolutely was not doing it all at once and risking the chance of ruining an entire hand. This was also before I started using Seche Vite so I had to wait the full time for it all to dry. If I do this again, it will be on a nail wheel because it wasn't easy to do on my dominant hand at all. But I'm glad I did it because it turned out pretty awesome!

Friday, August 26, 2011

The peacock experiment

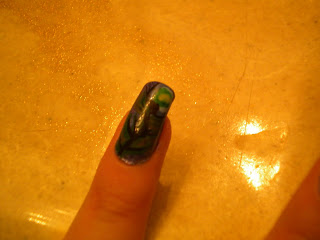
I wanted to do a peacock mani SO badly. I'd seen a lot of designs and I had all the colors so I decided to go for it. I knew I was not about to hand paint something that detailed on every single nail so I did it as an accent on my ring finger. I'm really happy with how it turned out and it's something I'd like to perfect later, but I think I need some different sized brushes. I was working with dotting tools and one brush. This might be something I'd like to try on somebody else so I have both hands to work with.