I needed something really bad ass for my Poison/Motley Crue concert mani. I knew it was going to be a black base and I'd just bought Sally Hansen Celeb City after having terrible experiences with silver foil polishes in the past but I'd seen a lot of other nail bloggers giving it great reviews, so I bit the bullet. It was actually pretty awesome! I went through my Konad and Bundlemonster plates and found these cute little kissy lip prints and fell in love. I'd also gotten a few other polishes with Celeb City so I decided to see how they stamped as well. Here's what I came up with :
In person? It was adorable and I got a lot of compliments, even by my husband who could care less about nail polish. Photographing? Didn't show up all that great. I'm a little disappointed by how badly it showed up because it was an adorable mani but I think it was just SO shiny that it wouldn't pick up with the flash and it wouldn't show up without the flash.
Friday, August 26, 2011
fishnet stockings
I was a little late, but I finally fell into the nude/taupe/concrete tone trends. I thought I wasn't going to like them because I usually go after brights, but it was a nice change, especially if I want to do a dark color but don't want to do black again.
So I picked up OPI for Sephora's Leotard Optional. I LOVE this color. Great formula, not streaky and just a really great base or wear alone nude.I actually bought it specifically for this mani. I love the fishnet pattern on the Konad plates but I was having an awful time getting it on my nails until I perfected my technique. You'll also get to see what I was talking about in the last post with the blue streaks from my hair dye, This may be my favorite go-to Konad mani, but it was totally ruined by the stupid streaks and I wish I could have worn this longer but the streaks drove me nuts. It didn't look finished with just the print, so of course I had to tie it together with the bows!
It's been awhile!
I went on a little bit of a hiatus for the past couple of weeks while I was house-sitting, at the Ohio State Fair (seeing my new boyfriend Blake Shelton, omg) and seeing Poison and Motley Crue (which was an AMAZING show) and doing some running around. I'm back now though and even though I wasn't posting, I didn't forget to take pictures of anything that I did on my nails so now there's going to be a post flood!
So I've been getting the hang of this Konad thing. One of my favorite stamps is the little bow so it shows up on a lot of my manis. I also got a pretty nice polish haul for the end of summer and wanted to play with as many of those as I could. This one features my new Essie polishes, Nice is Nice (a great creme lilac) and Mint Candy Apple (a minty creme)
Now, I'd been having a problem with my nails that I couldn't figure out for like a week, it was ridiculous. If I did a light colored polish (which had been mostly blues) I would get these dark blue streaks around the tips and I thought it was my top coats smearing when they dried or something. I tried different top coats, no top coat, but whatever I did, I still got these streaks. I was going crazy until I realized what it was. I had just gotten my hair done and the for some reason, the color was transferring to my hands, nails and all over my neck. My hair is a blue-black base color with thin highlights of bright blue. My neck was blue when I pulled my hair up, I had blue stains between my fingers, my brush bristles turned bright blue, but it wasn't transferring to my clothes or my pillow cases, so I guess it wasn't too bad but was it ever irritating. I rarely wear my hair up unless I haven't washed it in a day and eventually it stopped transferring... just in time for me to have to get it redone on Monday. So my new manis are going to be dark colors while I ride out the staining period.
Bonus! I did my toes with my Konad stamps as well!
I also bought Essie's Matte About You so I wanted to test it out. I was obviously on a blue kick so I went with OPI Ogre the Top Blue and made it matte, added some zebra stripes and silver glitter accents.
Labels:
animal print,
blue,
essie,
glitter,
green,
konad,
OPI,
pedi,
polka dots,
purple,
silver,
white
Thursday, July 21, 2011
First Konad Experience!
My Konad and Bundlemonster plates FINALLY came! I watched a few youtube tutorials and looked at a few designs to see what I wanted to do and I was all set to do something complex and intricate... but then I fell back to my favorite safety net, leopard print. For those who don't know, I'm a huge leopard print freak. In fact, my next tattoo is going to be a quarter sleeve of leopard prints on my right shoulder. I was excited to get stamping but quickly learned a few things.
Some polishes do not stamp well at all. I thought it was just me but after several trials, some of my polishes just aren't meant for stamping. That's fine, because a lot of them work just fine but a few were just not gonna happen. Also, I learned to work quickly but with a steady hand. Since you have to scrape the polish, it makes the polish still inside the design very thin and will dry quickly. I have to press pretty hard to get the whole stamp evenly. I was also really concerned about excess polish getting on the stamper and would try to re-scrape but it would always dry before I could stamp the image so I learned to just stamp it as is, clean it up on the stamper (it won't dry as quickly on there) and then stamp my nail. I also have pretty long nails and they're not flat so I have to be very precise about where and how I stamp on the actual nail. I wound up liking how the whole mani came out though.
I started by doing a white base but realized that I'd just done a white-based leopard mani so I started over. I wanted a brighter color so I went with Sally Hansen Complete Salon Manicure in Grass Slipper. I love the brush in CSM and the finish is great. I tend to use creme polishes over any other finish and this is a great bright green creme.
Because of how long my nails are, I had to stamp the leopard print on each nail twice, horizontally instead of vertically like the stamp is shown on the plate. I thought this was going to be a huge mess and an ugly disaster, but for my first time? I thought it was pretty good. I originally put white dots in the 'holes' in the print, but it wound up looking like snakeskin and actually showed up pretty dumb. I love that there's a clear 'animal print' feel about this.
Some polishes do not stamp well at all. I thought it was just me but after several trials, some of my polishes just aren't meant for stamping. That's fine, because a lot of them work just fine but a few were just not gonna happen. Also, I learned to work quickly but with a steady hand. Since you have to scrape the polish, it makes the polish still inside the design very thin and will dry quickly. I have to press pretty hard to get the whole stamp evenly. I was also really concerned about excess polish getting on the stamper and would try to re-scrape but it would always dry before I could stamp the image so I learned to just stamp it as is, clean it up on the stamper (it won't dry as quickly on there) and then stamp my nail. I also have pretty long nails and they're not flat so I have to be very precise about where and how I stamp on the actual nail. I wound up liking how the whole mani came out though.
I started by doing a white base but realized that I'd just done a white-based leopard mani so I started over. I wanted a brighter color so I went with Sally Hansen Complete Salon Manicure in Grass Slipper. I love the brush in CSM and the finish is great. I tend to use creme polishes over any other finish and this is a great bright green creme.
Because of how long my nails are, I had to stamp the leopard print on each nail twice, horizontally instead of vertically like the stamp is shown on the plate. I thought this was going to be a huge mess and an ugly disaster, but for my first time? I thought it was pretty good. I originally put white dots in the 'holes' in the print, but it wound up looking like snakeskin and actually showed up pretty dumb. I love that there's a clear 'animal print' feel about this.
My peacock tattoo on my foot decided to make an appearance :) My other 'animal print' love is peacock feathers. I'll probably be doing an peacock mani in the fall. I'm pretty devoted to brights for the summer.
I'm thinking that the leopard Konad plate will be my go-to if I hit a nail rut. It's simple, yet fun.
Now I'm waiting on a haul of Essie, OPI, China Glaze and Orly polishes. I can't wait for them to get here! I also got some great dotting tools and I'm eager to try Essie's Matte About You. I have a few of the OPI matte shades and originally hated the matte finish, but I've seen a few blogs where it's used and it actually turns out really nicely. I'll be trying my hand at matte-ifying a few mani's in the near future. Enjoy!
Tuesday, July 12, 2011
Tutorial: Pac-Man!
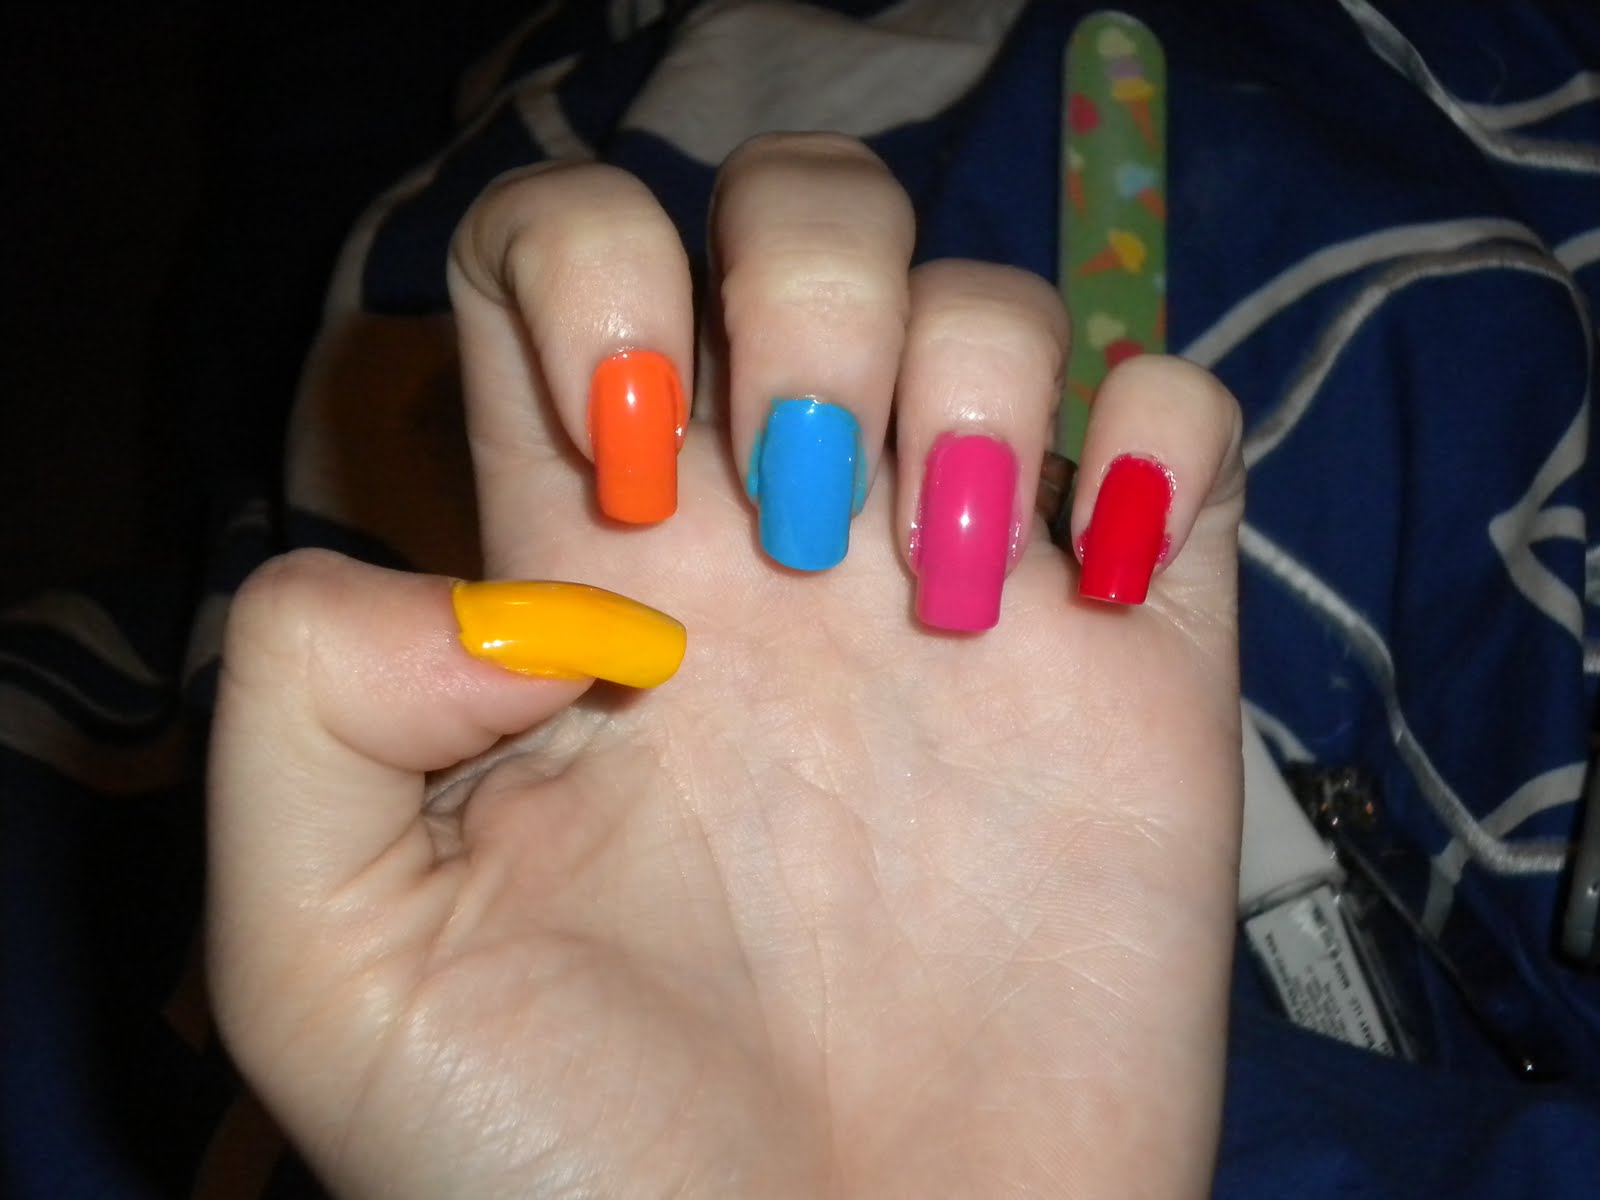
Today I decided to do a nail design that my husband would enjoy. He's the typical guy, he sees my nails and 'Oh that's nice...' so I figured that I would put something on there that he would pay attention to. I still don't have my Konad stamps so I went back to my nail brushes and googled some pictures and decided that I'd do a little Pac-Man scene and this time, I took pictures of each steps so I could put together a tutorial as well. So productive today!
What I used:
Then I used the Stripe Rite to draw the bottoms of the ghosts, just three little trangles at the tip of each nail.
On my thumb, I drew a V down from the tip of my nail to just above the center, like a < sign, but enough that it will look rounded when you're done. I filled that in with a regular black polish since the Stripe Rite can clump if you try to use too much of it. After that, I essentially did an inverted french tip to finish the half-circle shape of Pac-Man and filled it in as I did before. With the white Stripe Rite, I added the eyeballs for the ghosts
Add little black dots inside the eyes so the ghosts can see
Finally, you add an eye for Pac-Man. Finish with a top coat, but make sure everything is completely dry. There are a lot of little details that can very easily smear if you drag a top coat across it.
When I finished it, I called my husband to come see the Pac-Man nails and he loved them! He didn't want to admit that he thought nail polish was cool, but he couldn't resist something nerdy :) It's actually pretty easy to do once you break it up in steps, but the most important thing is to just let each step dry before starting the next to avoid smudges and smears. Enjoy!
What I used:
From pinky to thumb, I used
Sally Hansen Complete Salon Manicure Right Said Red (best true red ever!)
OPI That's Hot! Pink
Sally Hansen Xtreme Wear Blue Me Away
OPI In My Back Pocket
OPI The 'It' Color
Stripe Rite Black
Stripe Rite White (Not pictured, I thought I was going to use Whirlwind White but changed my mind)
Start by painting each nail a different color. Order doesn't really matter but the thumb has to be yellow.
Add little black dots inside the eyes so the ghosts can see
Finally, you add an eye for Pac-Man. Finish with a top coat, but make sure everything is completely dry. There are a lot of little details that can very easily smear if you drag a top coat across it.
When I finished it, I called my husband to come see the Pac-Man nails and he loved them! He didn't want to admit that he thought nail polish was cool, but he couldn't resist something nerdy :) It's actually pretty easy to do once you break it up in steps, but the most important thing is to just let each step dry before starting the next to avoid smudges and smears. Enjoy!
Friday, July 8, 2011
Bases and Top Coat: My Essentials
I've been asked by a lot of people about my nails. They're very real. I've had long nails for as long as I can remember (except for a period where I was wearing gel tips after a period where they were breaking and refusing to grow for whatever reason). I was even all set to not wear any fake nails for my wedding until two weeks before when my husband-to-be sat on my hand and broke my pinky nail down to the skin. He's lucky we actually got married after that ;) Since that incident, I attempted to get it to grow back as much as possible, but it didn't happen and I wound up having to go with the gels. I'm very happy with how my nails turned out though. I didn't want to do the typical bridal french, so I went with the basic french with black and hot pink (our wedding colors) color bursts. I think they came out great!
Now since 'The Incident', as my nail tech refers to it, I've gone to great lengths to insure that I do not have another break as bad as that one. It's been over a year and the only time my nails have been shortened has been when I've clipped them down a bit. I owe that to the three products that I swear by for nail growth and strength. All of these can be purchased at Sally's Beauty Supply and are pretty inexpensive (though the prices are escaping me right now)
The first of these three is my growth encouraging base coat. It's called Growing Nails with Garlic. The main thing to note is that this product does NOT smell like garlic. It says on the bottle 'odorless garlic' and I honestly smell nothing but usual nail polish. I put a coat of this on as soon as I take off my polish and before I reapply any new polish (if I go a day or so unpolished).
Next, I use a second base called Gelous Advanced Nail Gel Coat. This product is similar to what would be on your nails if you were to get a full set of gel nails. This stuff seems pretty thick but it dries quickly and really does it's job of protecting and strengthening nails.
Finally, my topcoat doubles as a hardener and a high gloss topcoat. I use Beauty Secrets Hardener. If I'm not wearing a polish, I always wear these 3 together. That horrible break before my wedding actually was grown back in full within about 2 months. I tend to have trouble sticking to beauty routines, but this one is something that I never skimp on.
Now since 'The Incident', as my nail tech refers to it, I've gone to great lengths to insure that I do not have another break as bad as that one. It's been over a year and the only time my nails have been shortened has been when I've clipped them down a bit. I owe that to the three products that I swear by for nail growth and strength. All of these can be purchased at Sally's Beauty Supply and are pretty inexpensive (though the prices are escaping me right now)
The first of these three is my growth encouraging base coat. It's called Growing Nails with Garlic. The main thing to note is that this product does NOT smell like garlic. It says on the bottle 'odorless garlic' and I honestly smell nothing but usual nail polish. I put a coat of this on as soon as I take off my polish and before I reapply any new polish (if I go a day or so unpolished).
Next, I use a second base called Gelous Advanced Nail Gel Coat. This product is similar to what would be on your nails if you were to get a full set of gel nails. This stuff seems pretty thick but it dries quickly and really does it's job of protecting and strengthening nails.
Finally, my topcoat doubles as a hardener and a high gloss topcoat. I use Beauty Secrets Hardener. If I'm not wearing a polish, I always wear these 3 together. That horrible break before my wedding actually was grown back in full within about 2 months. I tend to have trouble sticking to beauty routines, but this one is something that I never skimp on.
Macho-Man Randy Savage-1980's Neon Zumba Pants-Orange Tiger Stripes
I wanted to play with some more brights, but I wanted to do a tiger stripe with my new China Glaze polish. I bought Celtic Sun (Ink Collection) and Sun Worshiper (Poolside Collection) recently. I really like both colors, though I've only used Celtic Sun on my toes. It's a great bright yellow neon, but it is REALLY thin. I don't want to dedicate twelve coats per nail, so I start with a base of flat creme white polish first (my go-to is Sally Hansen InstaDry Whirlwind White) but just make sure the white base is totally dry before starting to layer with Celtic Sun. My big toe wasn't totally dry and I got a huge streak that wasn't going to be fixed unless I took all the polish off and started over.
Sun Worshiper, on the other hand, is a bit thicker and goes on pretty well in two coats. The only thing is that it actually dries with a matte finish and if you want it to shine, you need a top coat. I didn't mind that since I rarely go without one. I actually applied the top coat before adding the stripes, just in case the black was going to smear.
I followed the Things Every College Girl Should Know how-to on zebra print nails. I will admit, hers are MUCH more perfect looking than mine, but I was going for more of a tiger look than zebra and I think they fit the bill. Here's my finished result!
I love how they turned out. My thumbs look a little funny (which is why they aren't shown :) but I'm a lot happier with this mani than I thought I would be. I had to redo my right thumb after a day because the black stripes completely wore off, even with the top coat. That's never happened to me before and it hasn't happened again. Completely weird freak occurrence? Maybe.
What I used:
China Glaze Sun Worshiper
Stripe Rite Black
Sun Worshiper, on the other hand, is a bit thicker and goes on pretty well in two coats. The only thing is that it actually dries with a matte finish and if you want it to shine, you need a top coat. I didn't mind that since I rarely go without one. I actually applied the top coat before adding the stripes, just in case the black was going to smear.
I followed the Things Every College Girl Should Know how-to on zebra print nails. I will admit, hers are MUCH more perfect looking than mine, but I was going for more of a tiger look than zebra and I think they fit the bill. Here's my finished result!
I love how they turned out. My thumbs look a little funny (which is why they aren't shown :) but I'm a lot happier with this mani than I thought I would be. I had to redo my right thumb after a day because the black stripes completely wore off, even with the top coat. That's never happened to me before and it hasn't happened again. Completely weird freak occurrence? Maybe.
What I used:
China Glaze Sun Worshiper
Stripe Rite Black
Subscribe to:
Posts (Atom)